


In this section, we are going to discuss access modifiers and how to use them in C# coding.
As you notice we have already used access modifiers in our previous examples while creating classes, fields, properties and methods.
Look at the class definition.
public class Product
{
  // fields and properties here
}
While defining a class, we have to first define an access modifier. In this case, it is public. The same thing is applicable for other member definitions such as fields, methods, properties and events.
What are access modifiers?
Access modifiers define the scope of the member. It states where the member is accessible and where it is not accessible. In this section, we are going to understand access modifiers in detail with examples.
Access modifiers available in C#:
Five access modifiers are available in C# as given below.
- public
- private
- protected
- internal
- protected internal
Let’s first understand the most common access modifiers which we have already used, public and private.
Let’s create an example project so that we can understand each one of them with coding.
Open visual studio.
Create a new project by clicking ‘File > New Project’ menu item.

The ‘New Project’ dialog box will open.
Select template type ‘Visual C#’ and then select ‘Console Application’ project template.
Set the location of the project. Let’s name this project as ‘AccessModifierDemo’. Then click ‘Ok’ button.

This will create a new console application project within the solution having same name ‘AccessModifierDemo’.

Add a new project (of a type class for creating a class library) to the solution.
To do that follow the steps given below.
Right click on solution explorer and select click ‘Add > New Project’ menu item.
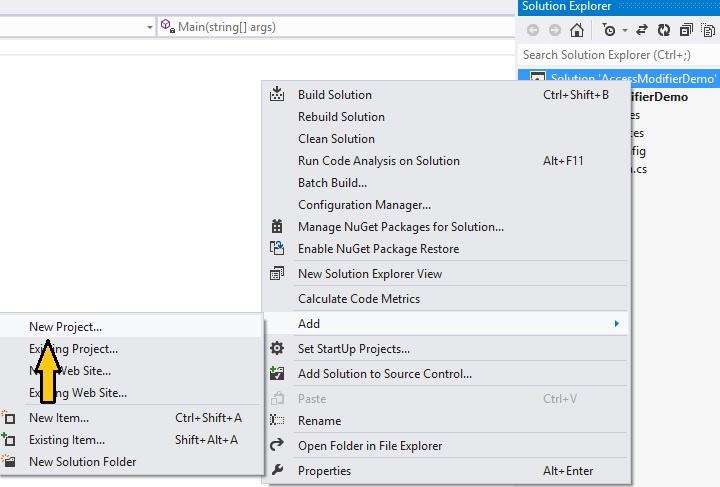
Select template type ‘Visual C# > Windows’ and then select ‘Class Library’ project template.
Name the project as ‘EmployeeInfo’. Don’t change the location. Click ‘Ok’ button.

This will add ‘EmployeeInfo’ project to our solution ‘AccessModifierDemo’.

When we add any new project of type ‘class’ to the solution, by default a file ‘Class1.cs’ is created.
There are two ways to start coding in any newly added project. The first is to rename the ‘Class1.cs’ file and then start coding. The second one is to delete ‘Class1.cs’ file and then add a new class file and start coding. Either approach is fine. It’s only the matter of preference.
For this project, we are going with the second approach.
Right-click on the ‘Class1.cs’ file and press ‘Delete’ menu item from the pop-up menu or select ‘Class1.cs’ file and simply press ‘Delete’ key. The confirmation dialog box will appear. Click on ‘Ok’ button. This will remove ‘Class1.cs’ file from ‘EmployeeInfo’ project.

Right click on ‘EmployeeInfo’ project and click ‘Add > Class’ from menu item.

Name the class as ‘Employee.cs’ and click ‘Add’ button. This will create a class file ‘Employee.cs’.

Add two properties to Employee class, first name and last name as shown in the following code.
Ex:
namespace EmployeeInfo
{
  public class Employee
  {
    private string _firstName;
    private string _lastName;

    public string FirstName
    {
      get
      {
        return _firstName;
      }
      set
      {
        _firstName = value;
      }
    }

    public string LastName
    {
      get
      {
        return _lastName;
      }
      set
      {
        _lastName = value;
      }
    }

  }
}
In above code, we have two fields, _firstname and _lastname both having a ‘private’ access modifier.
Also, we have two properties FirstName and LastName for first name and last name of an employee. We need to give access to these properties to any client code for creating and using object of ’Employee’ class. So we have assigned the access modifier ’public’ to these properties.
With ’public’ access modifier, member (field or property or method or event) is accessible anywhere by any class within the same project or any other project which references this project.
Both _firstname and _lastname fields have ’private’ access modifier. A class member with ’private’ access modifier is accessible only by the members of the same class. Any other class members don’t have access to it.
The FirstName and LastName properties are members of Employee class. The _firstname and _lastname fields are also members of employee class. Both properties have access to both fields because they all are members of the Employee class.
These fields values are assigned and retrieved by the properties through getter and setter.

Let’s understand this with an example.
Open ‘Program.cs’ file from ‘AccessModifierDemo’ project.
Add the reference to our EmployeeInfo project from same solution.
Right click on ‘References’ and click ‘Add Reference’ menu item.

This will open ‘Reference Manager’ dialog box.
In Solution > Projects, select ‘EmployeeInfo’ project and click ‘Ok’ button.

This will add reference to the ‘EmployeeInfo’ project.
In the Main() method, add the following code.
using System;
using EmployeeInfo;

namespace AccessModifierDemo
{
  class Program
  {
    static void Main(string[] args)
    {
      Employee employee = new Employee();

      employee.FirstName = “Chittaranjan”;
      employee.LastName = “Dhurat”;

      Console.WriteLine(string.Format(“Name: {0} {1}”, employee.FirstName, employee.LastName));
      Console.ReadKey();
    }
  }
}
Let’s go through above code.
First, we have given reference to the EmployeeInfo namespace (from EmployeeInfo project) with ’using’ statement at the top so that we can use ‘Employee’ class.
using EmployeeInfo;
In Main() method, we have created the employee object.
Employee employee = new Employee();
After that, we have assigned values to FirstName and LastName properties of the employee object.
employee.FirstName = “Chittaranjan”;
employee.LastName = “Dhurat”;
Important points to note:
We have access to these properties of Employee object because they have the public access modifier.
We don’t have access to fields of Employee object because they have the private access modifier.
The following code will throw compile time error.
employee._firstName = “Chittaranjan”;
employee._lastName = “Dhurat”;
In simple words, client code can only access the public members and not the private members of employee object.
Next, we have printed the name of the employee to console window using the following code.
Console.WriteLine(string.Format(“Name: {0} {1}”, employee.FirstName, employee.LastName));
Console.ReadKey();
Save all files by clicking ’Save All’ icon from top bar or press Ctrl + Shift + S.

Build the solution by clicking menu item ‘Build > Build Solution’ or ‘Build > Rebuild Solution’.

If no compile-time error found, run the application by pressing key ‘F5.
You will get the following output displaying the name of the employee.
Output:
Name: Chittaranjan Dhurat
To close the application either press ‘Enter’ key or click menu item ‘Debug > Stop Debugging’ (Shift + F5) or click stop debugging icon from toolbar, or click ‘Close’ icon from console output window.


Summary:
| Access modifier | Description |
| public | A class member can be accessed by any other class member within the same project or any other project. |
| private | A class member is accessible to all members of the same class and not to any other class members. |
In this section, we have learned what access modifiers are. We have seen what access modifiers are available in C#. Then we have discussed two most commonly used access modifiers ‘private’ and ‘public’ in detail with an example code.
|
|