


The table allows organizing data in rows and columns.
Create a new html file in your preferred editor and copy the generic html template to it. Then save it as ‘tables.html’.
To create an html table we have to use ‘table’ tag.
Inside ‘body’ tag, write the table having opening and closing tag as shown below.
<table>

</table>
Html table has rows and columns.
First, we need to write row tag and within row tag, we are going to write cell tags.
So lets write first table row as follows using <tr> opening and </tr> closing tag.
<table>
  <tr>

  </tr>
</table>
Now our table has one row. Lets add columns in it using <td> opening and </td> closing tag as shown below.
<table>
  <tr>
    <td>
    </td>
  </tr>
</table>
We can have multiple columns in a table. We can have multiple cells in one row. So, we can have multiple ‘td’ tags within a single ‘tr’ tag. Let’s add one more ‘td’ tag within ‘tr’ tag as shown below.
<table>
  <tr>
    <td>
    </td>
    <td>
    </td>
  </tr>
</table>
Now we have one row and two columns in our html table. Right now, cells in the table are empty. Let’s add some data to it as shown below.
<table border="1">
  <tr>
    <td>
      Jack Smith
    </td>
    <td>
      Web designer
    </td>
  </tr>
</table>
Note that we have added border attribute to table tag.
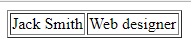
Now we have a table showing one record of employee displaying name and designation.
We can have multiple rows within a table having the same number of columns. Let’s add one more employee data to our table.
<table border="1">
  <tr>
    <td>
      Jack Smith
    </td>
    <td>
      Web designer
    </td>
  </tr>
 <tr>
    <td>
      Steve James
    </td>
    <td>
      Web programmer
    </td>
  </tr>
</table>
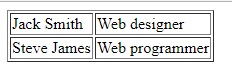
Now we have a table showing two records of employees displaying name and designation. We can add any number of rows to html table.
That’s looking good. But one thing is missing in this table is heading of columns. In this case, we need heading for employee name column and employee designation column. To give headings lets add the following row as the first row.
<tr>
  <th>
    Name
  </th>
  <th>
    Designation
  </th>
</tr>
As you noticed we can have heading tag ‘<th>’ (table heading) instead of ‘<td>’ tag for our heading row.
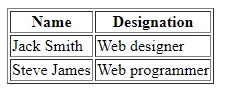
Now we have Name and Designation headings for employee data in the table.
Our table code will be as follows.
<table border="1">
  <tr>
    <th>
      Name
    </th>
    <th>
      Designation
    </th>
  </tr>
  <tr>
    <td>
      Jack Smith
    </td>
    <td>
      Web designer
    </td>
  </tr>
 <tr>
    <td>
      Steve James
    </td>
    <td>
      Web programmer
    </td>
  </tr>
</table>
Save our html file and open it in your preferred browser such as chrome. You will get following output.
Now, this looks great and we have our expected html table. Still, there are two more tags we can use in the table. Those are ‘thead’ and ‘tbody’.
Tag ‘thead’ is for a table heading and tag ‘tbody’ is for a table body. Though without these tags, we can have our html table but using them is a standard practice. So let’s see how to use it.
We have to wrap our heading row in ‘thead’ opening and closing tags as shown below.
<thead>
   <tr>
    <th>
      Name
    </th>
    <th>
      Designation
    </th>
  </tr>
<thead>
Next, we have to wrap all other rows in ‘tbody’ opening and closing tags as shown below.
<tbody>
  <tr>
    <td>
      Jack Smith
    </td>
    <td>
      Web designer
    </td>
  </tr>
 <tr>
    <td>
      Steve James
    </td>
    <td>
      Web programmer
    </td>
  </tr>
</tbody>
With these changes, our table code will be as shown below having ’thead’ and ’tbody’ tags.
<table border="1">
  <thead>
    <tr>
      <th>
        Name
      </th>
      <th>
        Designation
      </th>
    </tr>
  </thead>
  <tbody>
    <tr>
      <td>
        Jack Smith
      </td>
      <td>
        Web designer
      </td>
    </tr>
    <tr>
      <td>
        Steve James
      </td>
      <td>
        Web programmer
      </td>
    </tr>
  </tbody>
</table>
Now save the file and open it in a browser. You will get the same output as without ‘thead’ and ‘tbody’ tags.
In this section, we have seen how to create html table and how to format it with relevant children tags.