


Let’s now see heading tags available in html.
Open bracket application. Select our template html file from left-hand side panel. This will open our template code in the code editor.
Now click menu item ‘File > Save As’ and give a file name as ‘Headings.html’. Once you saved our new file, it will be selected and open in the code editor.
Now we have a new file code ready with our common tags and we only have to place the required tags within the body tags rather than typing the whole html structure every time we create a new file.
There are total six heading tags available in html and they are ‘h1’, ‘h2’, ‘h3’, ‘h4’, ‘h5’ and ‘h6’.
Let’s type all heading tags within body tags.
<h1>This is heading 1</h1>

<h2>This is heading 2</h2>

<h3>This is heading 3</h3>

<h4>This is heading 4</h4>

<h5>This is heading 5</h5>

<h6>This is heading 6</h6>
Either type the above code yourself or just copy and paste it into a code editor.
Save the file. (Ctrl + S).
Now preview the page by clicking the preview icon from right- hand side panel.
You will see the following output within the browser.
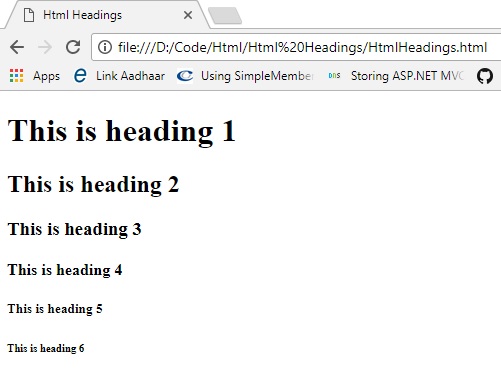
As you can see the h1 heading tag has a larger font than all other heading tags. All heading are formatted as bold.
Also as we go to other headings sequentially from 1 to 6, the size of heading is getting decreased and h6 heading has smallest font size.
The basic use of heading tag is to give heading or subheading to your page or any section of the page. It works as a title for that section.
It is the best practice to give every page a heading. That will help a user to know the purpose of a page.
For example, you can give ’Contact Us’ heading for contact us page and ’About Us’ heading on top of the page for about us page and so on.
Now you know what html headings are and how to use them in any html page. We are going to learn more tags from next section. But before that let’s see how to give line breaks and comments in html page.
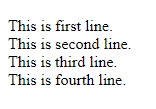
Let’s add some text in a paragraph to our html page as follows.
<p>
  This is first line.
  This is second line.
  This is third line.
  This is fourth line.
</p>
As you can see we have written four lines each on a separate line in the code editor.
Now save it and then preview it. You will see the following output in the browser.

As you can notice even though we have typed each sentence on separate lines, this is ignored by the browser and all the text is just right after each one.
Why is this so?
That’s because the extra white space whatever it may be is ignored by default. If we really want to specific content on a new line then we have to use the line break.
Line break html tag is ‘<br>’ or ‘<br />’.
Let’s add line breaks in our html code.
<p>
  This is first line.<br>
  This is second line.<br>
  This is third line.<br>
  This is fourth line.<br>
</p>
Now save the code and again preview it. You will see the output as follows. It is as per our expectation.
In above code, we have placed the line break tag to the end of each sentence. But you can put it anywhere like on the next line of just before starting of the next sentence as shown below.
<p>
  This is first line.<br>
  This is second line.
  <br>
  This is third line.
  <br>This is fourth line.<br>
</p>
If you save this modified code and again preview code then you will get the same output as previous one.
Let’s now understand what comments are and how to use them in html code.
The first purpose of comments in html code or any other programming language is to ignore some part of the code so that the compiler or the interpreter will ignore it. When you don’t want to show certain piece of code to a user then just comment it out. A user will not see that in a browser page.
Look at the following commented code.
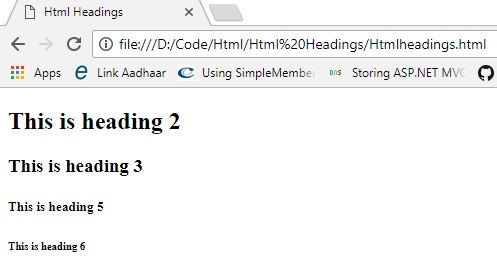
<!--<h1>This is heading 1</h1>-->

<h2>This is heading 2</h2>

<h3>This is heading 3</h3>

<!--
<h4>This is heading 4</h4>
-->

<h5>This is heading 5</h5>

<h6>This is heading 6</h6>
As you can see in above code we have commented out h1 heading and h4 heading.
Whatever code we want to comment out, we have to put it within ‘<!–‘ and ‘–>’.
To start the comment we have to use this ‘<!–‘ symbol which is the combination of less than symbol, exclamation, and two dash symbols.
To end the comment we have to use this ‘–>’ symbol which is the combination of two dash symbols and a greater than symbol.
As you can notice we have commented out h1 heading by placing the commented symbols in the single line.
To comment out h4 heading we have used starting and ending comment symbols on the different lines than that of the heading tag.
Whatever way you preferred to comment a piece of html code, the result will be same.
If you save this code and preview the page in the browser, you will see the following output ignoring the commented code (‘h1’ and ‘h4’ headings).
As we can comment out specific html code, we can also un-comment or remove comment to include previously commented code so that it will be displayed or executed by the browser.
To uncomment any commented code, simply remove the starting and ending commented symbol from the commented code that you wish to uncomment.
The first purpose of comments in html code or any other programming language is to write something about the code or specific part of html code so that when you or any other programmer or designer visit or view it later he or she will come to know why this code has been written.
Look at the following commented code.
<!-- These heading are for demonstration purpose only.
Use only heading that is required and remove all others. -->

<h1>This is heading 1</h1>

<h2>This is heading 2</h2>

<h3>This is heading 3</h3>

<h4>This is heading 4</h4>

<h5>This is heading 5</h5>

<h6>This is heading 6</h6>
As you can see in above code we have written a comment above all heading tags so that whenever we or any other coder see the code later he or she will know the purpose of the html code.
Many coders also prefer to write the name and date of coding in a comment section. Though many others including me don’t prefer this use of comment, it is the matter of choice either of the individual coders or the rules following by an organization.
That’s all about html heading tags. We have also seen what line breaks are. Then we discussed comments in html code.